As discussed from The previous Blog There are many Downloadable Stk. files that is available for Pivot, for our sake we are using the Latest Pivot version (as of now 4.2.6)
Moving Sticks Basic
For the First step when Pivot animator is opened, Basically for beginners, they don't really know what to do, looking at this. So first we need to know how to move things around. The basics.
Terminologies:
Orange: Frame Manipulation
- Deleting, Insert, Frames Etc.
Red: Playing Animation Manipulation
- Option for how fast the animation would be.
Blue: Stick,Background Library
- Brings the loaded Stick/Background into Workspace
Pink: Tools
- Affects the Selected Stick Figure
Gray: Menu bar
- Save, Open, Export, piv. files and Load, Edit stk. files.
Yellow: Workspace
-Working on each frames.
Green: Frame viewer
- View Frames.
For now we Don't need to load any figure so Clicking Add Figure would just add the Default Stick,
Will just delete the current stick.
Moving Sticks.
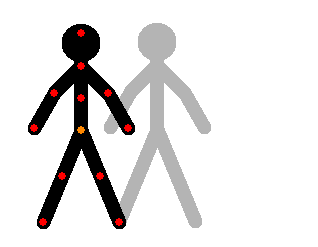
Origin: The Orange colored node is also known as "Origin" (Orange-in). Holding Left Click and Drag to this Node make the Whole selected Stick move around accordingly to the movement of the cursor, in the same way pressing the arrow keys also move the whole stick one pixel.
-There must be only One Origin per stk.
-There are no object/stk in pivot that doesn't have an Orange node/Origin.
-There must be only One Origin per stk.
-There are no object/stk in pivot that doesn't have an Orange node/Origin.
Joints: The Red Colored nodes are called "Joints" These nodes work differently from Origin, for now let's just state the basics of it for there are ton's of way and technique going on about these nodes. Depending on the stk. file we are using, but lucky for this tutorial we are only setting example for the default stick so lucky us.
- There can be none, or 255 Joints (unlimited on the next update) in one stick (0 - 255)
Holding Left Click and Drag to an example node will result to move the stick joint prior to the previous joint e.g.
When you have 2 or more stk. in the working area (to have that done click the  ) and move (Click by Origin and Drag) the stick in the left side. Notice the other stks will have different color.
 ) and move (Click by Origin and Drag) the stick in the left side. Notice the other stks will have different color.
The Blue colored joints are un-selected stick, and the red colored joint's are selected stick, when pressing  the selected stick will be gone, to select many stick at once You can hold "SHIFT" while clicking other sticks, or Hold click and Drag (Like selecting many files in document) but this method must select all the stick's Origin, so this method is not the most optimal one, The other method is "CRTL+A" this selects all the stick in the work space.
 the selected stick will be gone, to select many stick at once You can hold "SHIFT" while clicking other sticks, or Hold click and Drag (Like selecting many files in document) but this method must select all the stick's Origin, so this method is not the most optimal one, The other method is "CRTL+A" this selects all the stick in the work space.
Adding Frames
First, if you're new to animation what is Frame? All we did previously was just moving sticks around we haven't really started animating yet.
Early Animation uses "flipnote" process where they have to draw pictures repeatedly while the picture move accordingly from the previous picture, this set of pictures is then flipped and a fast occurrence of chronological order that then gives of the illusion that it is Moving.
Now in Animations these pictures are called "frames" and the term used for how fast these frames would be shown one after the other is called "Frames per Second"(FPS) Now everything would be simple to explain if the program would work the same as that that Straight forward, Each frame we have to draw, and start the drawing on each frame from scratch. But working Digitally it may complicate things a little bit but when you get a hang if it it works like a Printer, printing your homework with answer except you forgot how the printer works.
Now In pivot we don't need to start from scratch every time we press  it will just move us to the next frame with the current frame at work.
 it will just move us to the next frame with the current frame at work.
Here are the changes when we press  notice that the image in the "Frame viewer" is the same as how your current "Workspace" look like, then the "Frame indicator"
 notice that the image in the "Frame viewer" is the same as how your current "Workspace" look like, then the "Frame indicator"
went up from 1 to 2, This is because when clicking  it add's the frame that we are currently working on to the "Frame viewer", and moves us to work on the next frame so if we click the frame that we just added in the "Frame Viewer". (Clicking the highlighted blue in this image)
 it add's the frame that we are currently working on to the "Frame viewer", and moves us to work on the next frame so if we click the frame that we just added in the "Frame Viewer". (Clicking the highlighted blue in this image)
The "Frame Indicator" (Highlighted Red) Tells us which Frame we are working on. Clicking  again will make the "Frame Indicator"
 again. Next is when we move (By Origin)
 again will make the "Frame Indicator"
 again. Next is when we move (By Origin)
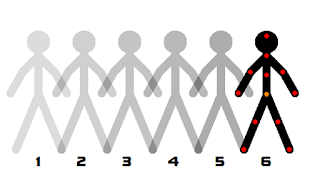
 The Lightly Gray Colored is not Gray, It is Light Color of the Selected Stick, This is Called "Onion Skin" this tells us how the currently selected stick look like from the previous frame, The distance between the selected stick and the onion skin is called "Spacing" (Animation Terminologies) Spacing Suggest How Far the Stick moved from the previous Frame, and clicking
  will add the current frame and has the onion skin move to what is the previous frame look like (you're now currently working on Frame 3 and you're previous frame is Frame 2).
Clicking Add frame until reach 6 frames (Frame indicator will show 7)
Then Manipulate your FPS.
And then Click Play.
Recommended FPS:
For Starters: 12-14fps
For those who feel confident: 14-16fps
For those who practice alot: 16-18fps
For those who is making longer animations (20mins long): 18-23fps
For those Movie Animations: 23-33fps
Result By FPS:
6.5 FPS
14.1 FPS
17.5 FPS
33 FPS
You can probably Tell by now that the bigger the FPS the Faster the animation would go, That means that when working with a greater FPS takes more Frames to make 1 scene last long as we want this is called "Timing" (Animation Terminologies), Timing expands in to how many Frames would you work on if you want things to last long or not, so for example you want a scene to last for 3 seconds and you're working on 18FPS so 3*18 = 54, You will need 54 frames to achieve this "Timing".
Now we can Save the animation as .piv file and have it finish. Experiment more on which FPS you feel comfortable, For beginners the Comfort zone usually between 12 to 15.
Happy Animating.
More Help from:
https://www.youtube.com/watch?v=FM8YKMOyfu4


No comments:
Post a Comment